Prepping the new stereo
If Crutchfield carries a custom wiring harness for your vehicle, you can use it to connect your new stereo to your vehicle's factory wiring harnesses. This will ensure that everything works seamlessly, just like the factory stereo did.
If a harness is not available for your vehicle or if the factory stereo plug was cut off, you'll need to identify each of the stereo wires and connect them to the corresponding wires of your new stereo. If you purchased your new stereo from Crutchfield, our Tech Department may be able to tell you the colors and functions of your car's stereo wires.
Crimping and Soldering
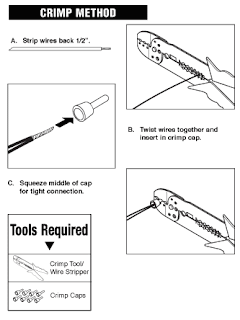
Decide whether you want to crimp or solder the wires together. Crimping is faster and easier. If you crimp the wires together, be sure to use the correct size crimp connector — typical in-dash stereo wires are 18-gauge, but a few use heavier gauge power and ground wires. There are several types of crimp connectors, including bullet connectors, butt connectors, or crimp caps (pictured below).
Soldering creates a permanent, professional connection that ensures maximum current transfer. We strongly recommend that you use heat-shrink tubing and a heat gun to insulate the soldered connection. Avoid taping the wires together — the tape will dry out and fall off, exposing the wires and making it only a matter of time before something shorts out.  Power
Power
Usually, it is best to make all of the new stereo's wiring connections via the wiring harness, but if you have to make a direct power connection, you'll need to know the difference between "switched" and "constant" power.
A switched power source is only on when the ignition is keyed — connect your new stereo's main (switched) power lead to a switched power source, so that the stereo will turn off when you turn off the car, and not drain your vehicle's battery.
A constant power source is always on — connect your new stereo's memory lead to a constant power source, so that you don't lose your stereo preset, sound shaping, and clock settings every time you turn off the vehicle.
A rare few high-powered stereos require you to make a direct constant power connection at the positive terminal of your vehicle's battery. This requires a heavier gauge power wire, an in-line fuse (usually included), and a ring terminal to connect the power wire to the battery clamp. You will have to route the power wire through the vehicle firewall and into the engine compartment in order to make the connection at the battery.
Ground
A good ground connection is vital for proper stereo performance. If you are not using a custom wiring harness, look for a bolt, screw, or wire that contacts the bare metal of your vehicle's chassis. Loosen the bolt, slip the ground wire underneath (this is almost always a black wire), then tighten the bolt. If your ground wire doesn't contact bare metal, your stereo won't operate. A loose or weak ground connection can result in signal noise interfering with your music.
In-dash video wiring
If your new stereo has a video monitor built in, you will also need to connect a wire to your emergency brake circuit's ground wire. This wire acts as a switch to turn on the video monitor when the parking break is engaged. Follow the instructions included with your in-dash monitor to locate the emergency brake ground wire.

Car Stereo Installation Guide part 2


