JVC KD-DV6101

Enjoy a higher-level of in-car audio-visual entertainment with an array of advanced features � including GIGA MP3, DAB ready, and Dual-Zone Function. The Front AUX Input ensures easy connection with external devices and the MOS-FET power amp with 24-bit resolution DAC provides superior sound.


Features of the JVC KD-DV6101 include:

  • Power Output: 50W x 4
  • CD/CD-R/CD-RW Compatible
  • DVD-R/RW Compatible
  • MP3/WMA Compatible
  • DTS/Dolby Digital/MPEG Audio
  • 54MHz/10-Bit Video DAC
  • 7-Band iEQ
  • Line Output Terminals (x 2 pairs)
  • Multi-Colour Display with Dimmer Control
  • Rotary Encoder Multi-Control
  • Flip-Down Face
  • Digital Output (Optical)
  • Multi-Function Wireless Remote Control

JVC KD-DV5101

Enjoy DVD movies or MP3/WMA music files on DVD. The 10-bit/54MHz video DAC delivers high-resolution pictures, while superior sound is ensured by 24-bit resolution 1 bit DAC. Features include RDS, Digital 7-Band iEQ, and compatibility with Steering Remote Control.


Features of the JVC KD-DV5101 include:

  • Power Output: 50W x 4
  • CD/CD-R/CD-RW Compatible
  • DVD-R/RW Compatible
  • MP3/WMA Compatible
  • DTS/Dolby Digital/MPEG Audio
  • 54MHz/10-Bit Video DAC
  • 7-Band iEQ
  • Line Output Terminals at rear (x 1 pair)
  • Multi-Colour Display with Dimmer Control
  • Rotary Encoder Multi-Control
  • Flip-Down Face
  • Digital Output (Optical)
  • Multi-Function Wireless Remote Control

JVC KD-DV4201

A comprehensive entertainment centre for your car. The unit plays movies, CD/CD-R/RW, MP3/WMA files. Connect your ipod via the optional KS-PD100 and access all functions via the front panel control as if you were operating the iPod itself.


Features of the JVC KD-DV4201 include:

  • 4 X 45 Watts Power Output
  • CD/CD-R/CD-RW Compatible
  • DVD-R/RW Compatible
  • MP3/WMA Compatible
  • GIGA MP3
  • DTS/Dolby Digital/MPEG Audio
  • cEQ
  • Line Output Terminals at rear (x 1 pair)
  • Multi-Colour Display with Dimmer Control
  • Rotary Encoder Multi-Control
  • Adjustable Line Input
  • RDS HS-IV Tuner
  • DAB Ready
  • iPod Ready

JVC KD-DB711

This CD receiver with built-in DAB tuner lets you enjoy digital quality sound and text information from digital radio. Choose from dozens of new stations as well as all of your regular favourites. 4 X 50W power, this full-featured unit plays CD/CD-R/CD-RW, MP3and WMA files and features an easy to read, multi-colour display.


Features of the JVC KD-DB711 include:

  • Power Output: 50W x 4
  • CD/CD-R/CD-RW Compatible
  • MP3/WMA Compatible (with ID3/WMA Tag)
  • Built-In DAB Tuner
  • HS-II Tuner
  • cEQ
  • 2V Line Output Level
  • Line Output Terminal at Rear (1 x pair)

JVC KD-AVX1

Just a glance at the face tells all. This innovative 1-DIN DVD receiver integrates a 3-inch colour TFT face panel for showing DVD movies, TV programmes, and more. The wide array of advanced features includes GIGA MP3, DAB full control, and the superior sound of a MOS-FET power amp backed up by 96kHz/24-bit DAC.


Features of the JVC KD-AVX1 include:

  • Power Output: 50W x 4
  • Built-In 3-Inch Monitor
  • MOS-FET Power Amp
  • CD/CD-R/CD-RW Compatible
  • DVD-R/-RW/VCD Compatible
  • MP3/WMA Compatible with ID3/WMA Tag
  • GIGA MP3
  • 96kHz/24-Bit AUDIO DAC
  • 27MHz/10-Bit Video DAC
  • Digital 7-Band iEQ
  • Gold-Plated Line Output Terminals (x 2 pairs)
  • Rotary Encoder Multi-Control
  • Motorised Slide-Out Face
  • Digital Output (Optical)

JVC CH-X550

The X550 features a shockproof full-floating mechanism, 1-Bit digital-to-analog converter, see-through 12-disc magazine and angled mounting capability. The compact size (252 x 88 x 174mm) makes JVC's range the world's smallest 12-CD in-car Changers*. World's Smallest 12-CD Changer*, CD/CD-R/CD-RW Compatible, Shockproof Full-Floating Mechanism, Angled Mounting Capability.


Features of the JVC CH-X550 include:

  • Changer Type - AudioCD
  • Disc Capacity - 12
  • CD-R/CD-RW Playback - CD-R/CD-RW
  • General:
  • CD Text - Yes
  • Disc Titling - Yes
  • Display Panel - Yes
  • Dimensions:
  • Depth - 6.85 in.
  • Height - 3.46 in.
  • Width - 9.92 in.

JVC CH-X1500

CD/CD-R/CD-RW and MP3 capability allows you to create and travel around with up to 120 hours of music in your car. The 1-bit DAC and error recovery system ensure fine reproduction and the fully floating shock absorption system further protects your precious music from the rigours of the most demanding roads. This compact unit can be mounted in the boot or under a seat either vertically or horizontally with three alternative mounting angles in between.


Features of the JVC CH-X1500 include:

  • CD/CD-R/CD-RW Compatible
  • MP3 Compatible
  • 1-Bit DAC (24-bit Resolution)
  • Shockproof Full-Floating Mechanism
  • CD Text Capability
  • Angled Mounting Capability

Car Stereo Installation Guide part 4

Dealing with "Premium" factory systems
If your vehicle has a Premium sound system or an integrated stereo/climate control panel, you will probably need a special "OEM integration" adapter in order to install a new stereo. The appropriate adapter can be purchased from . An adapter allows you to use a new stereo with your existing speaker system.


Evaluation

By now you should have some idea of what is involved in replacing your factory stereo with a new, better, aftermarket stereo. The next step is to see if Crutchfield has a MasterSheet™ for your vehicle. That's a set of installation instructions custom designed for your specific vehicle. It will describe every step of the process and tell you where to find every screw you need to remove for the installation. A MasterSheet™ takes all the guesswork out of the installation.

Even without a Crutchfield MasterSheet™, most people can install an in-dash stereo without much trouble, using just the tips in this article. This in turn leads to a savings in installation fees ($50 is common, and often it's more). But if you would rather not tackle the task, there are competent and highly trained professional stereo installers in every town where you'd find teenagers and cars.

Car Stereo Installation Guide part 3

Installing the new stereo
If the original stereo was bolted into the dash, you might need to remove the mounting brackets from the sides of it and attach them to the sides of your new stereo. More likely, you will need a mounting kit (which may include a trim ring, a dash insert, brackets, a faceplate, and/or a metal mounting sleeve) to install the stereo (Figure 1).

If a mounting kit is required, install it first. Then slide the new stereo's metal mounting sleeve (if included) into the kit. Secure the metal sleeve by using a screwdriver to bend the sleeve's metal tabs into place (Figure 2).


Once the dash opening is ready for the new stereo, hold the stereo near the opening. Connect the stereo wiring adapter to the vehicle's wiring harness and plug in the antenna cable.

Slide the stereo into the dash opening, but don't fasten it down just yet. First, test the stereo to make sure everything is working properly. It's easier to fix a problem while everything is still exposed. Turn on the power and try each source (AM, FM, and CD). Then adjust the balance and fader settings to check that each speaker is working. Once you're sure the stereo is wired and working properly, finish securing it in the dash and reinstall any pieces of dash trimpanel that you removed.

Installing a backstrap
A mounting bracket — or backstrap — is often included with new stereos. For most installations, a backstrap usually is not a necessary part of the installation process. However, it can be useful to help support the stereo in your dash; it also helps reduce vibration. One end of the backtrap attaches (with a screw) to the rear of the stereo. The other end attaches to an existing bolt or screw behind the dash. Just bend and shape the backstrap as necessary to enable mounting.

Car Stereo Installation Guide part 2

Prepping the new stereo
If Crutchfield carries a custom wiring harness for your vehicle, you can use it to connect your new stereo to your vehicle's factory wiring harnesses. This will ensure that everything works seamlessly, just like the factory stereo did.


If a harness is not available for your vehicle or if the factory stereo plug was cut off, you'll need to identify each of the stereo wires and connect them to the corresponding wires of your new stereo. If you purchased your new stereo from Crutchfield, our Tech Department may be able to tell you the colors and functions of your car's stereo wires.

Crimping and Soldering

Decide whether you want to crimp or solder the wires together. Crimping is faster and easier. If you crimp the wires together, be sure to use the correct size crimp connector — typical in-dash stereo wires are 18-gauge, but a few use heavier gauge power and ground wires. There are several types of crimp connectors, including bullet connectors, butt connectors, or crimp caps (pictured below).

Soldering creates a permanent, professional connection that ensures maximum current transfer. We strongly recommend that you use heat-shrink tubing and a heat gun to insulate the soldered connection. Avoid taping the wires together — the tape will dry out and fall off, exposing the wires and making it only a matter of time before something shorts out.
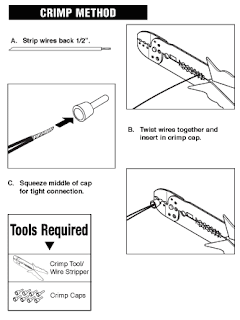
 Power
Usually, it is best to make all of the new stereo's wiring connections via the wiring harness, but if you have to make a direct power connection, you'll need to know the difference between "switched" and "constant" power.

A switched power source is only on when the ignition is keyed — connect your new stereo's main (switched) power lead to a switched power source, so that the stereo will turn off when you turn off the car, and not drain your vehicle's battery.

A constant power source is always on — connect your new stereo's memory lead to a constant power source, so that you don't lose your stereo preset, sound shaping, and clock settings every time you turn off the vehicle.

A rare few high-powered stereos require you to make a direct constant power connection at the positive terminal of your vehicle's battery. This requires a heavier gauge power wire, an in-line fuse (usually included), and a ring terminal to connect the power wire to the battery clamp. You will have to route the power wire through the vehicle firewall and into the engine compartment in order to make the connection at the battery.

Ground
A good ground connection is vital for proper stereo performance. If you are not using a custom wiring harness, look for a bolt, screw, or wire that contacts the bare metal of your vehicle's chassis. Loosen the bolt, slip the ground wire underneath (this is almost always a black wire), then tighten the bolt. If your ground wire doesn't contact bare metal, your stereo won't operate. A loose or weak ground connection can result in signal noise interfering with your music.

In-dash video wiring
If your new stereo has a video monitor built in, you will also need to connect a wire to your emergency brake circuit's ground wire. This wire acts as a switch to turn on the video monitor when the parking break is engaged. Follow the instructions included with your in-dash monitor to locate the emergency brake ground wire.
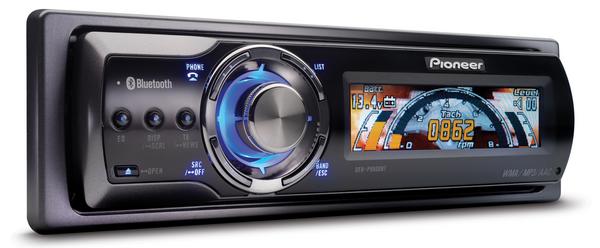
Car Stereo Installation Guide part 1

You need:


When installing a new stereo in your car, your first step will be to remove the old stereo. Pay close attention to the steps involved, for the process for installing your new stereo will be the same, but in reverse.


Removing the factory stereo
For detailed information on how to remove the factory stereo in a specific vehicle, refer to your Crutchfield MasterSheet™ instructions, if available. They will walk you through the process step-by-step. Otherwise, you may use the general guidelines below.


Before you begin, start by setting the parking brake and removing the negative cable from the car battery to prevent accidently short circuiting something.

Your factory stereo will be mounted in one of two ways:

  • secured in a metal mounting sleeve by spring clips
  • bolted to the dash with brackets
Spring clip mounting
If the stereo is held in by spring clips, you'll need a pair of DIN tools. Insert the DIN tools into the holes on eitter side of the unit until a click is heard. The tools serve to release the spring clips a
nd also hook onto the sides of the stereo so that you can pull it out easily. Spread the tools apart slightly then pull the stereo out of the dash.

Bolted in place

Sometimes, accessing the stereo requires the removal of one or more trimpanels from the dash. You may have to (carefully) pry the plastic trim away from the dash (which is often secured by hidden pressure clips), or locate and remove bolts to disassemble other pieces of panel. Once you have gained access to the factory stereo, removal should be obvious. The stereo will almost always be secured by four screws, sometimes bolted directly to the front of the dash, other times secured to side brackets. Remove the screws and pull the stereo from the dash.

American cars built before the early 1980s often came with a "shaft-style" stereo, which secured to the dash via nuts and washers to the right and left knobs. A shaft-style stereo must be installed from behind the dash. Getting it into position is the tricky part, since your vehicle's wiring, heater controls, and ductwork may be in the way.


Unplugging the factory stereo
If your vehicle has (or once had) a factory stereo, or if it was pre-wired with a "stereo prep" package, there should be at least one plastic wiring harness behind the stereo opening. This plug(s) connects the stereo to your vehicle's electrical system, and also makes the speaker connections. You will need to unplug the factory stereo from the wiring harnesses, and unplug the antenna to complete the removal process.

Theft Protection

There are a few ways to trick any potential thieves who look in your window to see what you have in your car if you don't have an alarm.

Most decks have a detachable face so that you can take it off and put it in its case to either hide away or take with you if it is worth it. This way the thief can't see your fancy deck and they'll only see a blank spot.

Another trick that can make it look like you have an alarm would be to get an LED light (usually red) that is several inches long and either flashes or moves the light back and forth like a real one would. Even a dark but still legal tint would be worth thieves not being able to peek in your vehicle.

If you have spent over $1000 on your car audio system, then I would definitely recommend getting a car alarm, especially if you live in a bad neighborhood. There are many different types that you can get that will make stealing for thieves next to impossible. Some give a warning and some will zap you. Even if the thief cuts off the battery power there are alarms designed to still sound the siren without battery power. From vibration detection to touch detection, there is an alarm for you.

I would not want to spend a large sum of money on a sound or video system and then have it stolen because that would be a huge waste of money. Depending on what extent you want to take your vehicle's security to, most alarms range in price from $40-$500. It would probably all depend on what kind of vehicle you drive or how much money you have put into your car.

Alpine CDA9851R

This head unit delivers SwingFace quality and features in a highly affordable package - offering a built-in amplifier for high power (no need for a separate amp), and optimum compatibility with your factory-installed system. It also has three 4V PreOuts for maximum power and minimum noise in the front, rear and subwoofer channels.


Features of the Alpine CDA9851R include:

  • MP3/WMA Decoder/Playback
  • CD-R / CD-RW Compatibility
  • Zero Data Mute (0 bit Mute)
  • MP3 Text Information Display (ID3 Tag)
  • Regulated 1-bit DAC
  • CD Text Display and Scroll
  • Disc Title Memory (18 titles / 16 letters)
  • CD Connectivity:
  • Ready for iPod
  • Versatile Ai Link
  • Vehicle Display Interface
  • OEM Steering Remote Control Ready
  • CD Power Specifications:
  • 50W x 4 High Power Amplifier
  • 2V Performance Voltage Pre Out
  • 3 PreOuts
  • CD Display Performance:
  • Dual Illumination (Amber/Green)
  • 5 x 7 Dot Matrix LCD Display
  • CD Audio Processing:
  • Treble Center Frequency Control
  • Bass Width Adjustment
  • Bass Center Frequency Control
  • Subwoofer Level Control
  • Bass Engine
  • CD Other Higlights:
  • ISO Connector Ready
  • Rotary Encoder Volume Control
  • Max Tune Tuner

Alpine CDA9847R

This convenient, high-performance head unit is all about connections - it lets you connect and smoothly control your iPod player. It also seamlessly connects to your car's built-in sub-display and steering remote. What's more, you can change the panel illumination to one of four colours to match your dashboard.


Features of the Alpine CDA9847R include:

  • CD-Features:
  • MP3/WMA Decoder/Playback
  • CD-R / CD-RW Compatibility
  • Zero Data Mute (0 bit Mute)
  • MP3 Text Information Display (ID3 Tag)
  • Regulated 1-bit DAC
  • CD Text Display and Scroll
  • Disc Title Memory (18 titles / 16 letters)
  • CD Connectivity:
  • Ready for iPod
  • Versatile Ai Link
  • Vehicle Display Interface
  • OEM Steering Remote Control Ready
  • CD Power Specifications:
  • 2V Performance Voltage Pre Out
  • 3 PreOuts
  • 45W x 4 High Power Amplifier
  • CD Display Performance:
  • Dual Illumination (for other buttons in (Red/Green)
  • Quad Illumination (for 4 buttons in Blue/Green/Amber/Red)
  • 14seg x 12 LCD-Display
  • CD Audio Processing:
  • Treble Center Frequency Control
  • Bass Width Adjustment
  • Bass Center Frequency Control
  • Subwoofer Level Control
  • Bass Engine
  • CD Other Higlights:
  • ISO Connector Ready
  • Rotary Encoder Volume Control
  • Max Tune Tuner

Alpine CDA-9847


Features of the Alpine CDA-9847 include:

  • Player Type - CD
  • Controlled Devices - CD Changer / Sirius Ready / XM Ready / iPod
  • MP3 / WMA Playback - MP3 Playback / WMA Playback
  • Anti-Theft Protection - Detachable Face Panel
  • Built-In Power Amplifier
  • Built-In Amplifier RMS Power - 4 x 18 Watts RMS
  • Built-In Amplifier Power - 4 x 50 Watt
  • FM Presets - 12
  • AM Presets - 6
  • Tuner Type - FM / AM
  • Depth - 6 in.
  • Height - 2 in.
  • Width - 7 in.

Alpine CDA9815RB


Features of the Alpine CDA9815RB include:

  • Tuner CD player / CD changer controller
  • 60 watts power for each of four channels
  • i-Personalize TM
  • MediaXpander TM
  • 6-Position Digital Crossover
  • Bass Focus
  • 5-Band Digital Parametric EQ
  • MP3 Compatibility
  • MobileHub TM

Alpine CDA9813R


Features of the Alpine CDA9813R include:

  • i-Personalize
  • MediaXpander TM
  • 6-Position Digital Crossover
  • 5-Band Digital Parametric EQ
  • MP3 Compatibility
  • Mobile Hub
  • API-MRPF240
  • V-Power Technology
  • Adjustable Bass EQ
  • Speaker Level Inputs
  • DC-DC Converter Power Supply
  • Non-Fading PreOuts
  • Built-in Crossover
  • 75Wx4 (MAX)
  • RMS 14.4V Power
  • 100W x 2 [4Bridged (0.3%THD)]
  • 50W x 4 RMS [2(0.3%THD)]
  • 40W x 4 RMS [4(0.08%THD)]

Alpine CDA9812RR


Features of the Alpine CDA9812RR include:

  • Bass Engine(R)Plus Functions
  • 4-Channel Digital Time Correction
  • Bass Centre Frequency Control
  • Bass Width Control
  • Treble Centre Frequency Control
  • 3-Position 12dB/Oct Crossover
  • Subwoofer Level Control
  • Subwoofer Phase Selector
  • TUNER :Auto
  • Memory
  • Up/Down Seek
  • Local/DX Selection
  • Preset Address Indicator
  • CD :Digital Servo
  • Music Sensor Up/Down
  • Forward/Backward Disc Play/Pause
  • M.I.X
  • (Random Play)
  • Music Scan
  • Repeat
  • CD Changer Control
  • Music Sensor Up/Down
  • Forward/ Backward
  • Disc Play/Pause
  • M.I.X
  • (Random Play)
  • Repeat
  • Music Scan GENERAL
  • ISO Connector Ready
  • Power Antenna Lead
  • Remote-on Lead

Alpine CDA9812RB

With 60 watts per channel of built-in power and playback capability for your MP3 and WMA tracks - plus MediaXpander processing for making those compressed tracks really shine - the CDA-9812RB is ideal as a power-packed stand-alone component, or as an solid basis for an extended multimedia system.


Features of the Alpine CDA9812RB include:

  • Tuner:
  • �MAX TUNE PRO� Tuner (FM18/MW6/ LW6)
  • Radio Text
  • RDS
  • Auto Memory
  • Up/Down Seek
  • CD:
  • Disc Title Memory
  • CD TEXT Display and Scroll
  • Regulated 1 Bit DAC
  • Music Scan
  • Track/Folder Search Menu
  • MP3/WMA Decoder/Playback
  • Digital Servo
  • Music Sensor Up/Down
  • Forward/Backward
  • Disc Play/Pause
  • M.I.X. One/All (Random Play One or All)
  • Repeat
  • CD-R/-RW Compatible
  • CD Changer Control:
  • Music Scan
  • Disc Title Memory
  • MP3 Text Information Display (ID3 Tag)
  • Track/Folder Search Menu
  • CD TEXT Display and Scroll
  • Multi CD Changer Control (with KCA-410C)
  • Music Sensor Up/Down
  • Forward/Backward
  • Disc Play/Pause
  • M.I.X.
  • Repeat
  • Bass Engine:
  • Bass Engine Plus
  • Bass/Treble Centre Frequency Control
  • Bass Band Width Control
  • 4ch Adjustable Digital Time Correction
  • Bass Focus
  • Bass Type Selection
  • Subwoofer Level Control
  • Subwoofer Phase Selector
  • 3-Position HP/LP Crossover Control (12dB/Oct)
  • Audio:
  • 60W x 4 V-Drive High Power Amp
  • 3 PreOuts (4 Volt)
  • Versatile Link
  • MediaXpander
  • Volume Control
  • General:
  • Ai-NET
  • Quick Search
  • DVD Changer Control Ready
  • Black Out
  • SwingFace
  • Wireless Remote Control Included
  • Anti Theft Detachable Face Panel
  • Steering Remote Control Ready
  • Power Antenna Lead
  • Remote-ON Lead
  • Telephone Mute
  • Audio Interrupt In

Alpine CDA9811R


Features of the Alpine CDA9811R include:

  • Bass Engine(R) Plus Functions
  • 4-Channel Digital Time Correction
  • Bass Centre Frequency Control
  • Bass Width Control
  • Treble Centre Frequency Control
  • 3-Position 12dB/Oct Crossover
  • Subwoofer Level Control
  • Subwoofer Phase Selector
  • TUNER :Auto
  • Memory
  • Up/Down Seek
  • Local/DX Selection
  • Preset Address Indicator
  • CD :Digital Servo
  • Music Sensor Up/Down
  • Forward/Backward Disc Play/Pause
  • M.I.X
  • (Random Play)
  • Music Scan
  • Repeat
  • CD Changer Control
  • Music Sensor Up/Down
  • Forward/ Backward
  • Disc Play/Pause
  • M.I.X
  • (Random Play)
  • Repeat
  • Music Scan GENERAL
  • ISO Connector Ready
  • Power Antenna Lead
  • Remote-on Lead

Alpine CDA7998R

With its Bass Engine Pro soundtuning features, Data Download setup, MobileHub interface and total media compatibility - this large-panel FantomFace XL head unit is the perfect control/command centre for your dream audio system.


Features of the Alpine CDA7998R include:

  • Tuner:
  • MAX TUNE PRO Tuner (FM18/ MW6/ LW6)
  • Radio Text
  • DAB Ready
  • RDS
  • Auto Memory
  • Up/Down Seek
  • CD:
  • Optical Digital Output
  • Disc Title Memory
  • CD TEXT Display and Scroll
  • Regulated 1 Bit DAC
  • Music Scan
  • Track/Folder Search Menu
  • MP3 Decoder/Playback
  • Play List (MP3)
  • Digital Servo
  • Music Sensor Up/Down
  • Forward/Backward
  • Disc Play/Pause
  • M.I.X